Making a Weather Vane for Grade 1 Science
Jellybean had such a blast making a weather vane for her Grade 1 Science. We are busy learning about weather and one of her projects this week was a weather vane. To make your own you will need:
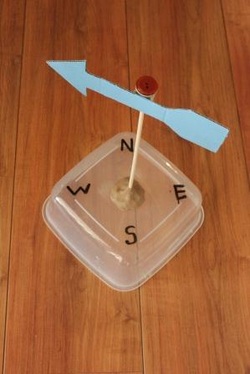
Use a large piece or square cardboard (I used an old tupperware). Mark the four corners with N S E and W to represent the directions. Place a ball of the clay in the centre and push the dowel stick into it. Leave to dry. Make sure the stick is pointing up straight.
Stick your button (or a round piece of cardboard) to the top of the spool to close one end off. Allow the glue to dry to ensure that the button is secure.
Cut an arrow from stiff cardboard. You can paint the arrow just to add some more fun to the project. Once the paint has dried on the arrow, stick the spool to the back of the arrow and place the spool on top of the dowel stick.
Take your weather vane outside in the morning and make sure that the E is pointing toward the east (remember the sun rises in the east so it shouldn't be too difficult to find). You can now track and record the wind direction throughout the day.
Jellybean had such a blast making a weather vane for her Grade 1 Science. We are busy learning about weather and one of her projects this week was a weather vane. To make your own you will need:
- Some self-drying clay
- Thick cardboard
- Dowel stick
- Spool
- Button
- Tape
Use a large piece or square cardboard (I used an old tupperware). Mark the four corners with N S E and W to represent the directions. Place a ball of the clay in the centre and push the dowel stick into it. Leave to dry. Make sure the stick is pointing up straight.
Stick your button (or a round piece of cardboard) to the top of the spool to close one end off. Allow the glue to dry to ensure that the button is secure.
Cut an arrow from stiff cardboard. You can paint the arrow just to add some more fun to the project. Once the paint has dried on the arrow, stick the spool to the back of the arrow and place the spool on top of the dowel stick.
Take your weather vane outside in the morning and make sure that the E is pointing toward the east (remember the sun rises in the east so it shouldn't be too difficult to find). You can now track and record the wind direction throughout the day.

 RSS Feed